Add a space
Add a room to a project in two short steps: pick its type, add the details you know, then fill it with product sections.
Why use it
Products, approvals, documents and client briefs are all filed under a space. Setting up each room first means every selection has a place, your totals add up by room, and your client can see their home room by room in the portal.
When to use it
- Starting a project. Add each room in scope before you source anything.
- Scope grows. The client adds a guest bath halfway through; add it as a new space.
- Unusual rooms. Use Custom for a wine cellar, a boot room or a studio, and save it as a template if you use it often.
To change an existing room instead, see Edit a space.
Before you start
- Open the project and choose View all in its Spaces section. You can also choose Add space on the project overview or at the end of the room strip on any space page.
Steps
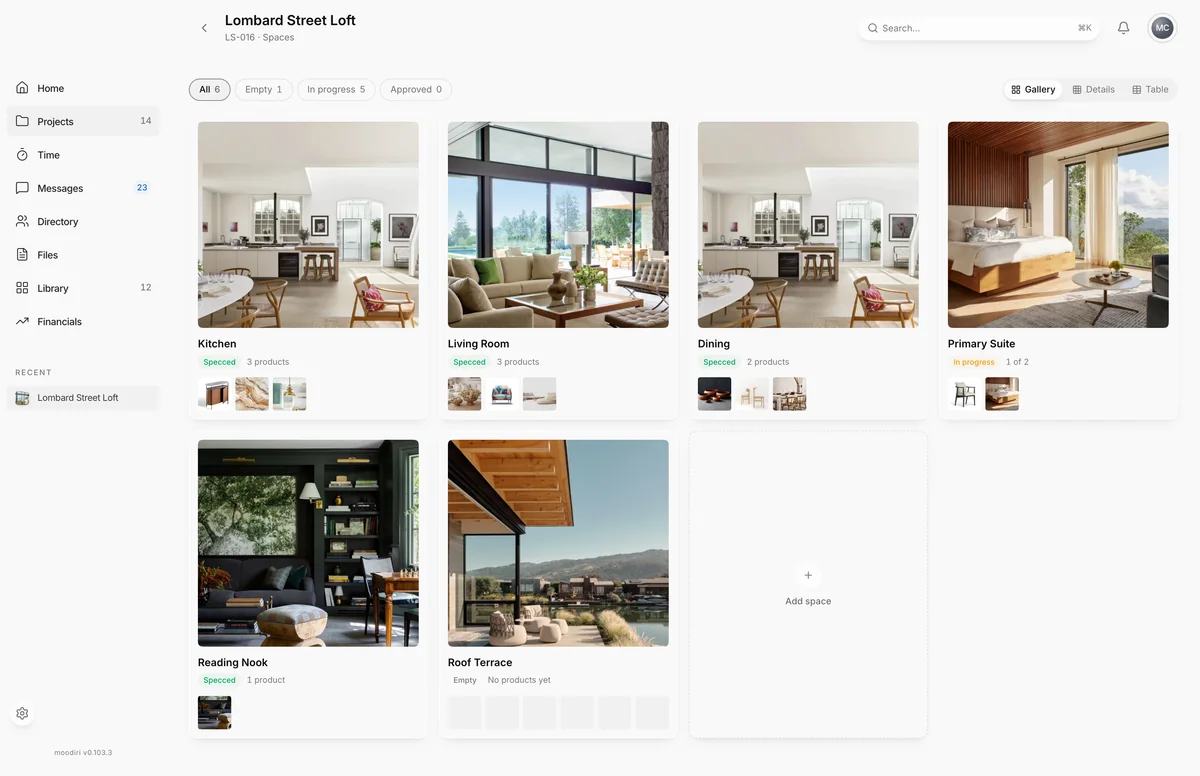
- On the spaces list, choose Add space to open the new space wizard.
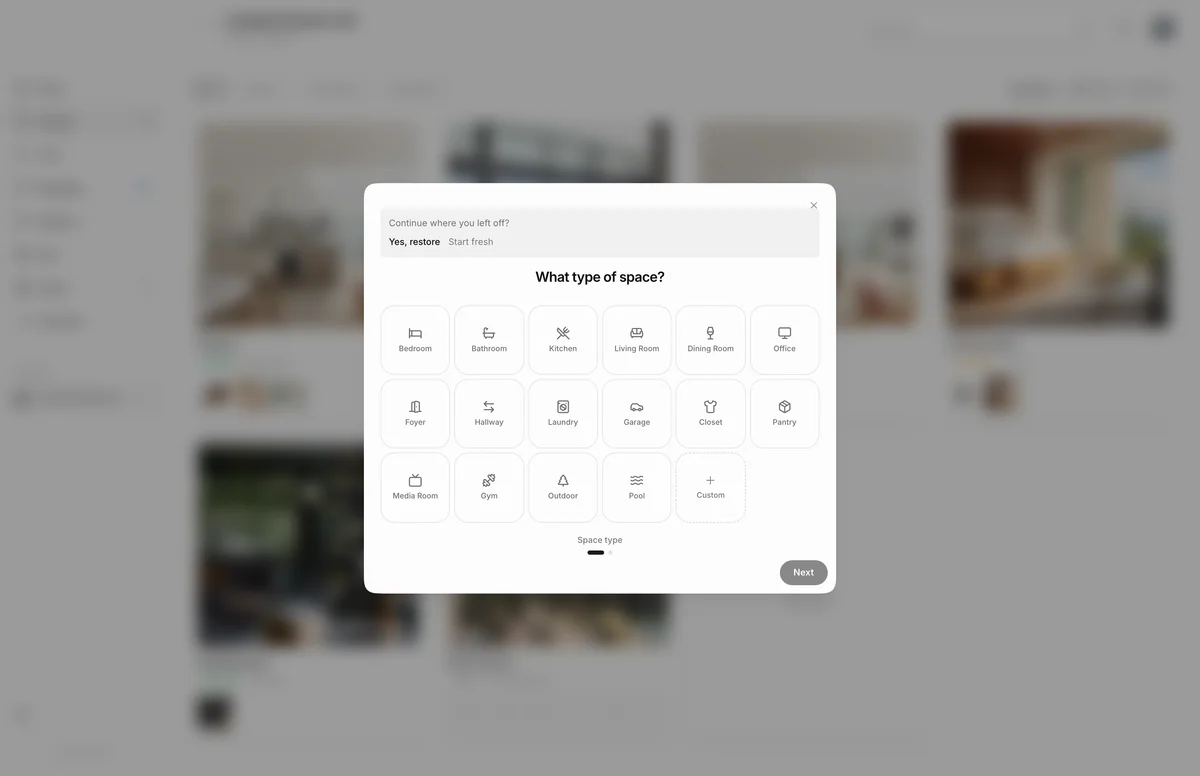
- Under What type of space?, choose a type, such as Office. It names the space for you.
- Choose Next to move on to the space's details.
- Add the Floor area (sqft) and Ceiling height (ft) you know, such as 180 sqft and 10 ft.
- Use Notes for style direction or anything to remember, up to 2,000 characters.
- Choose Add attribute and pick a fact to record, such as Floor material, then fill it in.
- Choose Create space to add the room to the project.
Choose a space type and custom icons
- 1Space wizard
There are 16 standard types, from Bedroom and Kitchen to Media Room, Gym, Outdoor and Pool. Picking one fills in the name, which you can change on the next step.
Choose Custom to name the space yourself. Next to the name, choose Upload custom icon to give it your own icon. Your saved custom spaces appear as tiles in the grid, so you can pick them like any other type.
Space details and attributes (Surfaces, Openings, Systems, Constraints)
The details step holds the space's name, floor area, ceiling height and up to 2,000 characters of notes, such as style direction or anything to remember.
Add attribute adds structured facts, grouped as:
- Surfaces: floor material, wall finish, ceiling type and ceiling finish.
- Openings: number of windows, natural light, view and exterior doors.
- Systems: HVAC type, soundproofing needed and humidity concerns.
- Constraints: furniture to keep and pets in the space.
Remove an attribute with the x on its row. Notes and attributes are saved with the space and can't be changed from Edit space later, so add what you know now.
Save a space to your space library / as a template
A custom space can be saved as a template so it shows up as a tile next time. Choose Save as space template next to its name, or choose Save to your space library on the confirmation screen after you create it.
Space templates are kept in the browser you saved them in. Your teammates don't see them, and they don't follow you to another computer.
Add product sections after creating a space
Choose Add product sections on the confirmation screen to fill the room with the items you plan to source, such as a sofa, a rug and lighting. Moodiri suggests a set of sections for the space type.
- Pick a different set from the template list, or search for a section.
- Choose sections one by one, or use Select all and Clear all.
- Change how many of a section you need, or choose + to add your own section.
- Choose Add to add them (the button shows the count, such as Add 6 sections), or Skip to leave the room empty.
If you change the suggested set and keep at least two sections selected, Moodiri offers Save as template so your firm can reuse the set. See Product sections and options.
What happens next
- The space is created as soon as you choose Create space, and the wizard shows You're all set.
- If you add product sections, Moodiri opens the new space with those sections waiting for options.
- If you choose I'm done for now, the new space appears on the spaces list.
- The space shows Empty until you add products. See Add products.
Limits
- Custom icons must be an image file under 250 KB (PNG, JPEG, SVG, WebP or GIF).
- You can save up to 30 space templates. They are stored in your browser only, not shared with your team.
- Only Custom spaces can be saved to the space library.
- Space names must be unique within a project.
- Notes hold up to 2,000 characters.
- Section photos in the product sections step must be under 1.5 MB.
Troubleshooting
- A space named "…" already exists in this project. Pick a different name. Choose the suggested name, such as Use "Kitchen 2", or type a new one.
- You've saved the maximum of 30 templates. Remove an old one to save a new one. Your space library is full in this browser.
- Your session expired. Sign in again to continue. Choose Sign in, then try again.
Questions
Can two spaces have the same name?
No. Names must be unique within a project, ignoring capitals. If you pick a name that is taken, Moodiri offers the next free one, such as Kitchen 2.
Why does Moodiri warn me about a second kitchen?
Most homes have one kitchen, foyer, garage, laundry, pantry, media room, gym and pool, so Moodiri checks before you add another. Choose Add anyway for a duplex or a guest house.
I closed the wizard by accident. Is my work lost?
No. The next time you open it in the same browser, it asks Continue where you left off? Choose Yes, restore or Start fresh.